Master the Grill: Irresistible Baby Back Ribs at Home!
Ever dreamt of sinking your teeth into perfectly tender, falling-off-the-bone ribs, bursting with smoky flavor, right in your own backyard? While restaurant-quality Baby Back Ribs might seem intimidating to achieve at home, I’m here to tell you it’s absolutely within reach! Beyond the undeniable satisfaction of creating a culinary masterpiece, preparing your own BBQ Ribs allows for complete control over ingredients, seasoning, and cooking methods, ensuring a healthier and more personalized dining experience. Get ready to impress your taste buds and your guests with this comprehensive guide to grilling the most succulent ribs you’ve ever tasted.
Ingredients & Kitchen Tools
- 2 racks (about 2-3 lbs each) Baby Back Ribs: Look for well-marbled racks with a good meat-to-bone ratio.
- For the Dry Rub:
* 2 tablespoons brown sugar (packed): Adds sweetness and caramelization.
* 1 tablespoon smoked paprika: Provides a rich, smoky depth.
* 1 tablespoon garlic powder: Essential aromatic.
* 1 tablespoon onion powder: Enhances savory notes.
* 1 tablespoon salt (kosher or sea): For seasoning and flavor enhancement.
* 1 teaspoon black pepper (freshly ground): A touch of spice.
* 1 teaspoon cayenne pepper (optional): For a subtle kick.
* 1 teaspoon cumin: Adds an earthy, warm flavor.
- For the Mop/Basting Sauce (optional, but recommended):
* ½ cup apple cider vinegar: Adds tang and tenderizes.
* ¼ cup water: Thins the sauce.
* 1 tablespoon Worcestershire sauce: Umami booster.
* 1 teaspoon hot sauce (optional): For extra heat.
- 1-2 cups of your favorite BBQ sauce: For glazing and finishing.
- Kitchen Tools:
* Sharp knife: For trimming.
* Paper towels: For patting ribs dry.
* Large baking sheet or pan: For marinating and carrying.
* Aluminum foil (heavy-duty): For wrapping the ribs during the “Texas Crutch.”
* Basting brush: For applying mop sauce and BBQ sauce.
* Meat thermometer: Crucial for ensuring doneness and food safety.
* Grill (charcoal or gas): The star of the show.
* Wood chips (hickory or applewood, soaked in water for 30 minutes): For optional smoky flavor on a gas grill or enhanced flavor on charcoal.
Prep Time & Cooking Schedule
- Prep Time: 20-30 minutes (including membrane removal and dry rub application).
- Marinating Time (optional but recommended for deeper flavor): 2-4 hours, or preferably overnight in the refrigerator.
- Cooking Time: Approximately 4-5 hours (plus 15-20 minutes resting time). This longer cooking process at a lower temperature is key to achieving tender, juicy results. Plan ahead to ensure you have ample time.
Step-by-Step Instructions
1. Prepare the Ribs: Begin by removing the membrane from the non-meaty side of the Baby Back Ribs. This thin, silverskin layer can be tough and prevent the rubs from penetrating, so it’s crucial for tender results. Use a knife to loosen a corner, then grip it with a paper towel and pull it off. Pat the ribs completely dry with paper towels.
2. Apply the Dry Rub: In a small bowl, combine all the dry rub ingredients. Generously coat both sides of the ribs with the rub, massaging it in thoroughly. For best results, let the ribs marinate in the refrigerator for at least 2 hours, or even overnight, allowing the flavors to meld beautifully.
3. Preheat Your Grill: Set up your grill for indirect heat. This means having a hot zone for searing and a cooler zone for slow cooking. Aim for a consistent temperature of 225-250°F (107-121°C). If using wood chips, add them now to your charcoal or in a smoker box on a gas grill for that authentic smoky aroma, perfect for BBQ Ribs.
4. The Initial Smoke/Cook (2.5-3 hours): Place the ribs bone-side down on the indirect heat zone of your grill. Close the lid and maintain a consistent temperature. If using a mop sauce, baste the ribs every hour to keep them moist and flavorful.
5. The Texas Crutch (Wrapping, 1.5-2 hours): Once the ribs have developed a nice bark (dark, seasoned crust), about 2.5-3 hours in, carefully remove them from the grill. Place each rack on a large piece of heavy-duty aluminum foil. You can add a splash of apple cider vinegar or beer to the foil packet for extra moisture. Seal the foil tightly, creating a steamy environment that tenderizes the ribs further without drying them out. Return the wrapped ribs to the indirect heat zone.
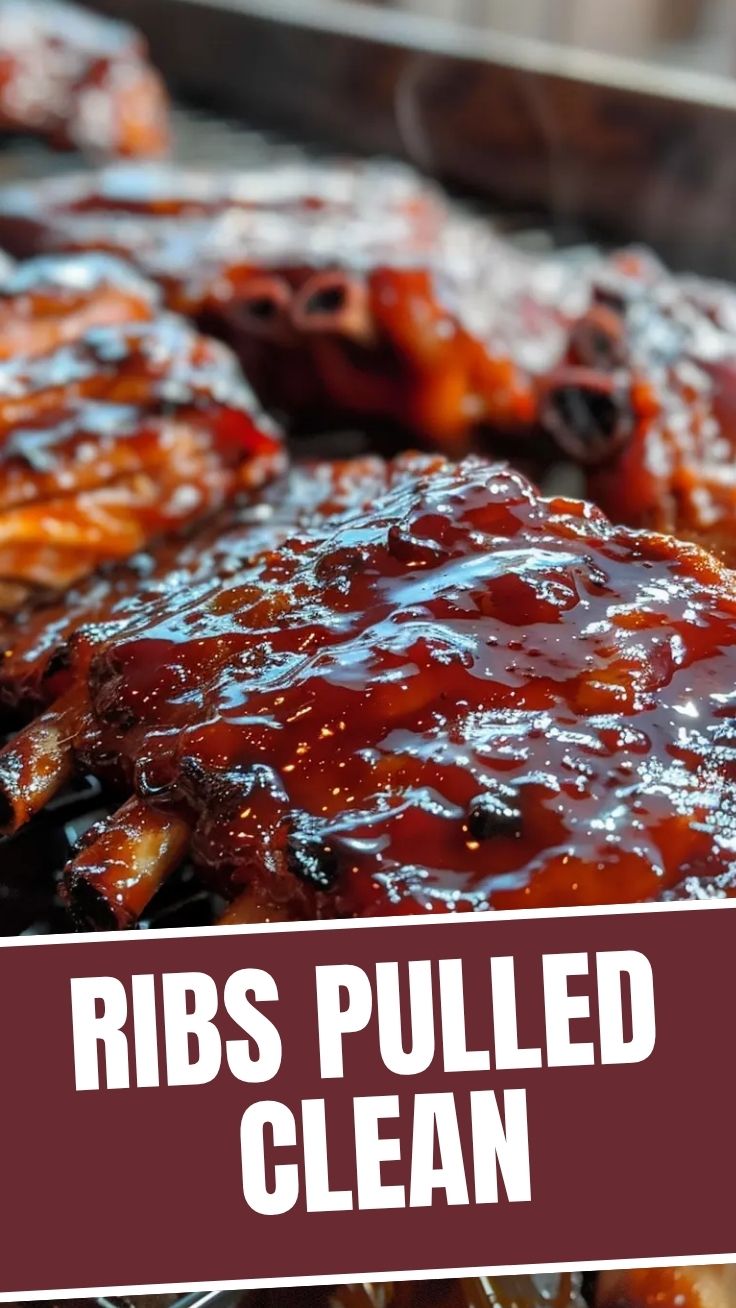
6. The Final Glaze (30-45 minutes): After 1.5-2 hours in the foil, carefully unwrap the ribs (watch out for steam!). Baste them generously with your favorite BBQ sauce. Place them back on the grill, unwrapped, over indirect heat. Continue to baste every 10-15 minutes until the sauce caramelizes and the ribs reach an internal temperature of 195-203°F (90-95°C). The meat should be very tender and easily pull away from the bone, but not fall off completely, which indicates overcooking.
7. Rest and Serve: Remove the ribs from the grill and let them rest for at least 15-20 minutes, loosely tented with foil. This allows the juices to redistribute, resulting in a more succulent and flavorful rack. Slice between the bones and serve immediately.
Nutritional Benefits & Advantages
Our homemade grilled ribs offer several nutritional advantages over their restaurant counterparts. By selecting lean cuts and controlling the sugar content in your dry rub and BBQ sauce, you can significantly reduce unhealthy fats and added sugars. Pork ribs are a good source of protein, essential for muscle repair and growth, and provide vital nutrients like zinc, phosphorus, and B vitamins. Grilling as a cooking method also helps to render excess fat, contributing to a lighter, healthier meal compared to frying or slow-cooking in excessive liquids.
Tips, Variations & Cooking Advice
- Smoked Ribs: For an even deeper smoky flavor, consider using a dedicated smoker throughout the entire cooking process.
- Spicy Kick: Increase the cayenne pepper in the rub or add a few dashes of your favorite hot sauce to the mop sauce or BBQ glaze.
- Sweet & Tangy: Experiment with different BBQ sauces – a peach or apricot-based sauce can add a delightful sweetness, while a vinegar-based sauce offers a bright tang.
- Herbal Infusion: Add dried herbs like rosemary, thyme, or oregano to your dry rub for an aromatic twist.
- Oven Finish: If outdoor grilling isn’t an option, you can complete the final glazing step in a preheated oven at 300°F (150°C) until the sauce caramelizes.
Common Mistakes to Avoid
- Not removing the membrane: This is crucial for tenderness and flavor penetration.
- Cooking at too high a temperature: Leads to tough, dry ribs. Low and slow is the mantra for perfectly tender ribs.
- Over-saucing too early: Adding BBQ sauce during the initial long smoke can cause it to burn. Only apply it in the final stages.
- Impatience: Ribs take time. Rushing the process will compromise the tenderness and flavor.
- Not resting the ribs: Skipping this step results in drier ribs as the juices haven’t had a chance to redistribute.
Storage & Meal Prep Tips
Leftover ribs can be stored in an airtight container in the refrigerator for up to 3-4 days. For longer storage, individual portions can be wrapped tightly in foil and then placed in a freezer-safe bag or container, where they will keep for up to 2-3 months. To reheat, thaw frozen ribs overnight in the refrigerator. Rewarm in a preheated oven at 300°F (150°C) until just heated through, about 20-30 minutes, or gently on a grill over indirect heat to maintain moisture and prevent drying out. A little extra BBQ sauce can be added during reheating to refresh the flavor.
Conclusion
There’s truly nothing quite like the satisfaction of creating mouth-watering, perfectly cooked Baby Back Ribs right in your own kitchen or backyard. With the right technique, a little patience, and this detailed guide, you can master the art of grilling succulent BBQ Ribs that will have everyone reaching for seconds. Give this recipe a try and share your results – I promise you won’t be disappointed!
FAQs
Q1: Can I use spare ribs instead of baby back ribs?
A1: Absolutely! Spare ribs are larger and meatier, requiring a slightly longer cooking time (often 5-7 hours total) but can be cooked using the same method.
Q2: What’s the best way to tell if the ribs are done without a thermometer?
A2: While a thermometer is best, the “bend test” is a good indicator. Pick up a rack of ribs with tongs in the middle; if the ribs sag and crack, they are done. Also, the meat should have pulled back from the ends of the bones, exposing about a quarter-inch of bone.
Q3: My ribs turned out tough. What went wrong?
A3: Toughness usually indicates cooking at too high a temperature or not cooking them long enough. Remember, low and slow is key for tender ribs. Ensure your grill temperature is consistent and give them ample time to cook.
Q4: Can I make this ahead for a party?
A4: You can cook the ribs up to the point of glazing, then refrigerate them. Reheat gently on the grill or in the oven, adding the BBQ sauce during the reheating process.
Q5: What are some good side dishes to serve with these ribs?
A5: Classic pairings include coleslaw, cornbread, baked beans, potato salad, macaroni and cheese, or grilled corn on the cob.
Best way to grow Baby Back Ribs using the 4-2-1 method
Ingredients
Equipment
Method
- Remove the membrane from the back of each rib rack, then season generously with the rib rub.
- Preheat your smoker to 225°F (107°C) and place the seasoned ribs directly on the grates. Smoke for 4 hours, maintaining a consistent temperature.
- In a large sheet of heavy-duty aluminum foil, create a boat for each rack of ribs. Add half of the apple cider vinegar, honey, and butter to each foil boat, then tightly seal the foil around the ribs. Return the wrapped ribs to the smoker and continue cooking at 225°F (107°C) for another 2 hours.
- Carefully unwrap the ribs, discarding the liquid from the foil. Generously brush both sides of the ribs with BBQ sauce. Place the unwrapped ribs directly back on the smoker grates and cook for a final hour at 225°F (107°C), or until the sauce is caramelized and the ribs are tender.
- Remove the ribs from the smoker and let them rest for 10-15 minutes before slicing and serving.