The Secret to Perfect Deviled Eggs: An Unbeatable Classic Made Easy
Ever wonder what makes those creamy, tangy, and utterly irresistible Deviled Eggs disappear so quickly at every potluck and gathering? The secret, as it turns out, isn’t as complex as you might think. Preparing this beloved classic at home isn’t just about saving money; it’s about crafting a dish that’s perfectly tailored to your taste, free from preservatives, and guaranteed to impress. From family dinners to festive parties, these delightful Egg appetizers are a crowd-pleaser that never goes out of style. Let’s dive into creating the ultimate version of this timeless snack that will have everyone asking for your recipe!
Ingredients & Kitchen Tools
To embark on your Deviled Eggs journey, gather these culinary essentials:
- 12 large eggs: The star of the show. Choose fresh eggs for the best results.
- ½ cup mayonnaise: Binds the filling and adds creaminess. You can use full-fat or light mayonnaise, or even a homemade aioli for an elevated flavor.
- 1 tablespoon Dijon mustard: Provides a subtle tang and depth. Yellow mustard can be substituted for a more traditional, milder flavor.
- 1 tablespoon white vinegar (or apple cider vinegar): Brightens the flavor profile and adds a touch of acidity. Fresh lemon juice is a good alternative.
- ¼ teaspoon salt: Enhances all the other flavors. Adjust to taste.
- ⅛ teaspoon black pepper: A hint of spice to balance the creaminess.
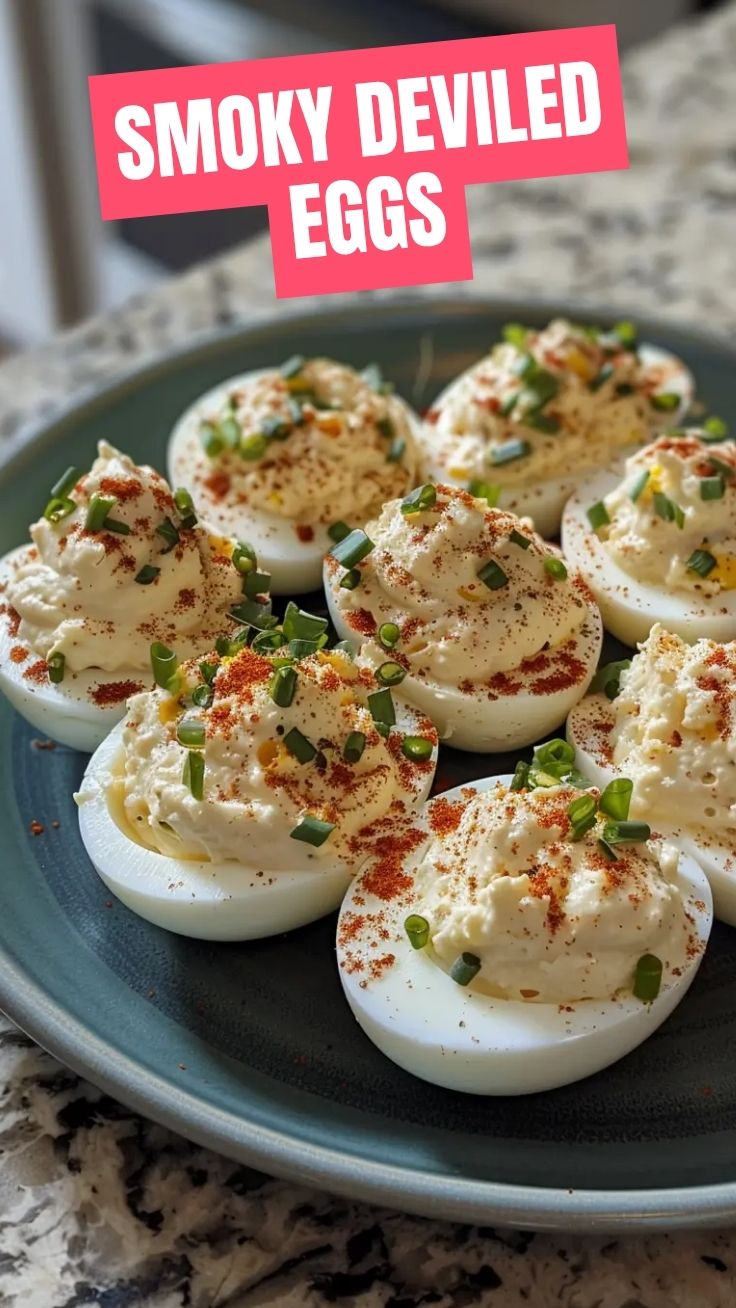
- Paprika (smoked or sweet) for garnish: Adds a pop of color and a subtle smoky note.
- Fresh chives, finely chopped (optional, for garnish): Adds a fresh oniony bite and elegance.
Kitchen Tools:
- Large saucepan or pot: For boiling the eggs.
- Slotted spoon: To carefully transfer boiled eggs.
- Large bowl (for ice bath): Essential for stopping the cooking process and making eggs easier to peel.
- Small mixing bowl: For preparing the creamy yolk filling.
- Fork or potato masher: To mash the egg yolks.
- Rubber spatula: For mixing and scraping the bowl.
- Piping bag with a star tip (optional): For an elegant presentation. A zip-top bag with a corner snipped off works just as well.
- Serving platter: To display your beautiful creations.
Prep Time & Cooking Schedule
- Prep Time: 15 minutes
- Cook Time: 12-15 minutes (for boiling eggs)
- Chilling Time (optional): 30 minutes (to allow flavors to meld)
Plan to allocate approximately 30 minutes to an hour from start to finish, depending on your speed and if you opt for chilling. The chilling step is purely for flavor development and isn’t strictly necessary if you’re in a hurry to serve these delightful bites.
Step-by-Step Instructions
1. Boil the Eggs Perfectly: Place the 12 large eggs in a single layer in a large saucepan. Cover with cold water by at least an inch. Bring the water to a rolling boil over high heat. Once boiling, immediately turn off the heat, cover the pot, and let the eggs sit in the hot water for 12-15 minutes. This method ensures tender whites and creamy yolks, perfect for your Deviled Eggs.
2. Ice Bath & Peel: While the eggs are resting, prepare a large bowl with ice water. Once the 12-15 minutes are up, use a slotted spoon to transfer the hot eggs directly into the ice bath. Let them cool for at least 10 minutes. This abrupt temperature change helps prevent the dreaded green ring around the yolk and makes them incredibly easy to peel. Gently tap and roll each egg on a hard surface to crack the shell, then carefully peel under cool running water.
3. Halve & Scoop: Once peeled, pat the eggs dry. Carefully cut each egg in half lengthwise using a sharp knife. Gently scoop out the bright yellow yolks into a small mixing bowl. Place the hollowed-out egg white halves on your serving platter.
4. Create the Creamy Filling: Using a fork or potato masher, thoroughly mash the egg yolks until smooth. Add the mayonnaise, Dijon mustard, white vinegar, salt, and black pepper to the mashed yolks. Mix everything until the filling is perfectly smooth and creamy, with no lumps. For optimal flavor and texture, ensuring this smooth consistency is key for delightful Egg appetizers. Taste and adjust seasonings as needed – perhaps a little more salt or mustard for extra zing.
5. Fill the Egg Whites: You have two options here. For a rustic look, simply spoon the filling back into the hollowed-out egg white halves. For a more elegant presentation, transfer the filling into a piping bag fitted with a star tip (or a zip-top bag with the corner snipped) and pipe the mixture beautifully into each egg white.
6. Garnish & Serve: Once all the egg halves are filled, sprinkle generously with paprika. If using, garnish with finely chopped fresh chives.
7. Chill (Optional): For best results and to allow the flavors to truly meld, cover the platter with plastic wrap and refrigerate for at least 30 minutes before serving.
Nutritional Benefits & Advantages
Deviled eggs are more than just a tasty snack; they offer several nutritional advantages. Eggs are an excellent source of high-quality protein, essential for muscle repair and growth, and keeping you feeling full longer. They are also packed with vital nutrients like Vitamin D, B vitamins (especially B12), choline (crucial for brain health), and selenium. While mayonnaise adds calories and fat, using a moderate amount or choosing a lighter alternative can maintain a healthy balance. This classic provides a satisfying and nutrient-dense bite, making it a smart choice for an appetizer.
Tips, Variations & Cooking Advice
- Spicy Kick: Add a dash of hot sauce, a pinch of cayenne pepper, or finely diced jalapeño to the filling for a fiery twist.
- Herbaceous Delight: Incorporate fresh herbs like dill, parsley, or chives into the yolk mixture for added freshness.
- Smoky Flavor: A tiny bit of liquid smoke or finely chopped crispy bacon bits can elevate the taste.
- Umami Boost: A teaspoon of Worcestershire sauce or a pinch of anchovy paste (it melts away!) can add a savory depth.
- Avocado Creaminess: For a richer, healthier twist, substitute half the mayonnaise with mashed avocado.
- Dietary Adaptations:
* Dairy-Free: Ensure your mayonnaise is dairy-free (most are).
* Gluten-Free: This recipe is naturally gluten-free.
* Keto-Friendly: A perfect keto snack as is!
Common Mistakes to Avoid
- Overcooking Eggs: This leads to rubbery whites and a greenish-gray ring around the yolk, which affects both texture and appearance. Stick to the 12-15 minute timing after boiling.
- Not Using an Ice Bath: Skipping this step makes peeling much harder and can result in sulfurous aromas.
- Lumpy Filling: Ensure you mash the yolks thoroughly before adding other ingredients for a smooth, creamy texture.
- Over-seasoning: Always taste and adjust. It’s easier to add more salt or mustard than to reduce it.
- Warm Filling: Chilling the completed eggs allows the flavors to truly develop and improves the overall experience.
Storage & Meal Prep Tips
Storage: Store leftover Deviled Eggs in an airtight container in the refrigerator for up to 2-3 days. While they are safe to eat after this, the texture and freshness diminish quickly.
Meal Prep:
- You can boil and peel the eggs up to 2 days in advance, keeping them refrigerated in a container or bowl of water.
- Prepare the filling a day ahead and store it in an airtight container in the fridge. On the day of serving, simply fill the egg whites, garnish, and serve. This significantly cuts down on last-minute prep.
- Deviled eggs do not freeze well, as the texture of the whites becomes rubbery and watery upon thawing.
Conclusion
Mastering the art of perfect Deviled Eggs is a truly rewarding culinary achievement. With just a few simple ingredients and clear steps, you can create a classic appetizer that’s both elegant and utterly delicious. These versatile Egg appetizers are a testament to how simple ingredients can yield extraordinary results, making them ideal for any occasion. Don’t hesitate to experiment with the variations to find your signature deviled egg recipe. Whip up a batch today, share your culinary triumphs in the comments below, and let the compliments roll in!
FAQs
Q1: How do I prevent the green ring around the yolk?
A1: The key is not to overcook the eggs and to immediately plunge them into an ice bath after the cooking process. The cold water stops the cooking and prevents the sulfur in the egg white from reacting with the iron in the yolk.
Q2: Can I make Deviled Eggs ahead of time?
A2: Yes, you can. You can boil and peel the eggs up to two days in advance. The filling can also be made a day ahead. Store the components separately and assemble them closer to serving time for the freshest taste and best appearance.
Q3: What can I use if I don’t have a piping bag?
A3: No problem! A regular zip-top plastic bag works perfectly. Simply spoon the filling into one corner of the bag, snip off the very tip of that corner, and pipe away. You can also just spoon the filling into the egg white halves for a rustic look.
Q4: My filling is too thin/thick. How can I fix it?
A4: If the filling is too thin, add a tiny bit more mashed yolk or a pinch of breadcrumbs (if you don’t mind gluten). If it’s too thick, add a small amount of mayonnaise or a splash of milk or water until it reaches your desired consistency.
Q5: What are some kid-friendly variations?
A5: For a kid-friendly version, keep the flavors mild. You can mix in a tiny amount of finely grated cheese (like cheddar), or a very small amount of sweet pickle relish, which adds a subtle sweetness kids often enjoy. Skip any spicy additions.
Proven way to grow 5 Deviled Eggs Recipes
Ingredients
Equipment
Method
- Place eggs in a single layer in a saucepan and cover with cold water by one inch; bring to a rolling boil over high heat, then immediately remove from heat, cover, and let stand for 10-12 minutes.
- Drain the hot water and transfer the eggs to an ice bath for at least 5 minutes to cool completely, which helps prevent a green ring around the yolk.
- Once cooled, peel the eggs, slice them in half lengthwise, and carefully scoop the cooked yolks into a small bowl, placing the whites on a platter.
- Mash the yolks with a fork until smooth, then stir in mayonnaise, Dijon mustard, white vinegar, salt, and pepper until the mixture is creamy and well combined.
- Spoon or pipe the yolk mixture back into the egg whites and garnish as desired.