The Ultimate Guide to Crafting the Perfect Loaded Baked Potato at Home
Are you tired of bland, uninspiring meals that leave you feeling unsatisfied? Imagine sinking your teeth into a warm, fluffy baked potato, overflowing with savory toppings, each bite a symphony of flavors and textures. Crafting the perfect Loaded Baked Potato at home isn’t just about cooking; it’s about creating a comforting, customizable culinary experience that rivals any restaurant dish. This comprehensive guide will walk you through every step, ensuring your homemade creation is a triumph, whether you’re aiming for a classic loaded spud or venturing into the delightful territory of Loaded Potato Skins. Let’s dig in and master the art of the perfect baked potato, a staple that can be both simple and spectacularly delicious.
Ingredients & Kitchen Tools
Here’s everything you’ll need to create your culinary masterpiece:
- Large Russet Potatoes (4-6): The quintessential baked potato choice. Their starchy flesh becomes wonderfully fluffy when cooked. Look for uniform size for even baking.
- Olive Oil (2 tbsp): For crisping the skin and infusing flavor. Any neutral oil will work.
- Sea Salt (1 tbsp): Crucial for seasoning the skin and enhancing the potato’s natural flavor.
- Black Pepper (1/2 tsp): Freshly ground for best aroma.
- Unsalted Butter (1/4 cup): For a rich, creamy interior. Can substitute with a dairy-free butter alternative.
- Sour Cream (1/2 cup): Classic creamy topping. Greek yogurt is a healthier, tangier substitute.
- Shredded Cheddar Cheese (1 cup): Melts beautifully and adds sharp, savory notes. Monterey Jack or a cheese blend also works well.
- Cooked Bacon, crumbled (1/2 cup): For that irresistible smoky, salty crunch. Turkey bacon is a leaner alternative.
- Fresh Chives, chopped (2 tbsp): Adds a fresh, oniony bite and vibrant color. Green onions are a good substitute.
- Optional Toppings: Chilis, sautéed mushrooms, caramelized onions, shredded cooked chicken, beef chili, or even a dollop of guacamole – personalize to your heart’s content!
Kitchen Tools:
- Baking Sheet: To catch any drips and ensure even cooking.
- Fork or Paring Knife: For piercing the potatoes.
- Oven Mitts: Essential for handling hot potatoes.
- Large Spoon: For scooping out the potato flesh.
- Mixing Bowl: For combining the potato flesh with butter and sour cream.
Prep Time & Cooking Schedule

- Prep Time: 10 minutes
- Cook Time: 60-90 minutes (depending on potato size)
- Resting Time: 5-10 minutes
Plan to start baking at least an hour and a half before you want to serve, especially for larger potatoes. The resting time is crucial for the internal steam to redistribute, resulting in a fluffier interior.
Step-by-Step Instructions
1. Preheat & Prepare: Preheat your oven to 400°F (200°C). Wash the potatoes thoroughly, scrubbing off any dirt. Pat them completely dry. This is key for a crispy skin.
2. Pierce & Season: Using a fork or paring knife, pierce each potato several times all over. This prevents them from exploding in the oven. Drizzle each potato with olive oil, rub it all over, then sprinkle generously with sea salt and black pepper.
3. Bake to Perfection: Place the seasoned potatoes directly on the oven rack for an even bake, or on a baking sheet if you prefer. Bake for 60-90 minutes, or until the skin is crispy and a fork can easily pierce the center. Larger potatoes will take longer.
4. Fluff & Load: Once cooked, carefully remove the potatoes from the oven. Using oven mitts, hold each potato and slice it lengthwise across the top, but don’t cut all the way through. Gently squeeze the ends to open it up.
5. Internal Magic: Scoop out most of the fluffy potato flesh into a mixing bowl, leaving a thin border attached to the skin. Add butter, sour cream, and half of the shredded cheddar cheese to the scooped-out potato. Mash and mix until creamy and well combined. Season with more salt and pepper to taste.
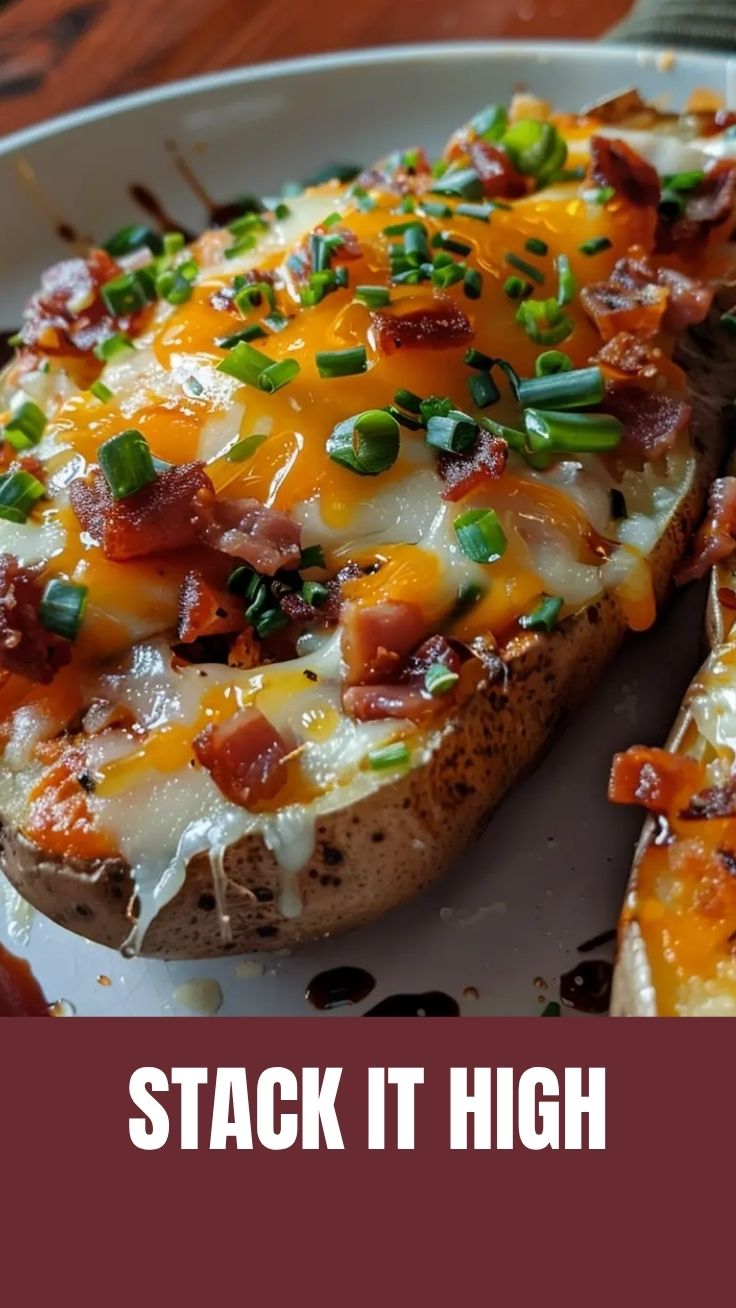
6. Re-stuff & Top: Spoon the creamy potato mixture back into the potato skins. Top each Loaded Baked Potato with the remaining shredded cheddar cheese, crumbled bacon, and fresh chives.
7. Final Melt (Optional): For extra melty cheese, return the loaded potatoes to the oven for another 5-10 minutes, or until the cheese is bubbling and slightly golden. This final step also works wonderfully if you’re transforming them into Loaded Potato Skins by scooping out even more flesh and baking them empty before stuffing.
8. Serve Hot: Serve immediately and enjoy your perfectly crafted creation!
Nutritional Benefits & Advantages
Russet potatoes, while often mischaracterized, are a nutritional powerhouse. They are an excellent source of Vitamin C, Vitamin B6, potassium, and dietary fiber, especially when eaten with the skin. The fiber aids digestion and promotes satiety, while potassium is vital for blood pressure regulation. By customizing your toppings, you can control the nutritional profile, adding lean proteins, healthy fats, and a variety of vegetables to create a balanced meal.
Tips, Variations & Cooking Advice
- Crispier Skin: For an extra crispy skin, try coating the potatoes in a thin layer of egg white mixed with salt before baking.
- Microwave First: If you’re short on time, microwave potatoes for 5-10 minutes (depending on size) to par-cook them, then finish in the oven for 20-30 minutes for that crispy skin.
- Flavor Variations:
* Southwest Style: Add black beans, corn, salsa, and a sprinkle of cumin.
* Broccoli Cheddar: Steam some broccoli florets and mix into the filling.
* Philly Cheesesteak: Top with thin slices of sautéed steak, onions, and bell peppers.
- Dietary Adaptations:
* Dairy-Free: Use dairy-free butter, sour cream, and cheese alternatives.
* Vegan: Omit bacon, use plant-based alternatives for butter, sour cream, and cheese. Add roasted vegetables or seasoned tofu.
Common Mistakes to Avoid
- Not Piercing Potatoes: This can lead to explosions in your oven, creating a messy situation.
- Overcrowding the Oven: Give potatoes space for even airflow, ensuring a crispy skin.
- Forgetting to Salt the Skin: The skin is where a lot of flavor resides; don’t skip the salt!
- Under-baking: A properly baked potato should be light and fluffy, not dense or hard in the center. Bake until a fork slides in easily.
- Cutting Too Deep: When slicing, avoid cutting all the way through the potato, as it will make it harder to hold its shape when loaded.
Storage & Meal Prep Tips
Leftover baked potatoes can be stored in an airtight container in the refrigerator for up to 3-4 days. To reheat, you can microwave them, but for the best texture, reheat in an oven at 350°F (175°C) for 15-20 minutes, or until heated through. Alternatively, scooping out the potato flesh and mashing it with a little milk or cream creates a delicious base for future meals. These also make an excellent base if you are planning to make Loaded Potato Skins later in the week.
Conclusion
Mastering the Loaded Baked Potato is a culinary skill that offers endless possibilities for customization and comfort. Whether you prefer a classic rendition packed with cheese and bacon or venture into more adventurous toppings, this guide provides the foundation for a truly exceptional meal. Remember to pierce, season, and bake until perfectly fluffy for that ideal texture. And don’t forget the versatility – these spuds are equally fantastic as the base for Loaded Potato Skins. What are your favorite toppings? Share your creations and newfound potato expertise in the comments below!
FAQs
Q1: Can I bake potatoes in a microwave?
A1: While you can par-cook potatoes in a microwave to save time, finishing them in the oven is crucial for achieving that desired crispy skin and fluffy interior. Microwaving alone often results in a rubbery texture.
Q2: How do I know when a baked potato is done?
A2: A perfectly baked potato will feel tender when squeezed gently, and a fork or skewer should easily pierce the center with no resistance. The internal temperature should reach 210°F (99°C).
Q3: What’s the best way to get a super crispy potato skin?
A3: Patting the potatoes completely dry before rubbing with oil and salt is key. Baking directly on the oven rack (without foil) and potentially increasing the oven temperature slightly for the last 10-15 minutes can also help create a crispier skin.
Q4: Can I make loaded baked potatoes ahead of time for meal prep?
A4: You can bake the potatoes ahead of time and store them. However, for the best flavor and texture, it’s recommended to assemble and load them freshly right before serving. The internal potato mixture can be prepared ahead and refrigerated.
Loaded Baked Potato
Ingredients
Equipment
Method
- Plant a seed potato in well-drained soil, ensuring it receives plenty of sunlight and water regularly.
- Allow approximately 3-4 months for the potato to grow and mature, then carefully harvest it from the soil.
- Preheat your oven to 400°F (200°C) and scrub the harvested potato clean.
- Prick the potato multiple times with a fork, then bake directly on the oven rack for about 60 minutes, or until tender.
- Carefully slice open the hot baked potato lengthwise and fluff the interior with a fork.
- Generously fill the potato with butter, sour cream, shredded cheddar cheese, bacon bits, and chopped green onions, then serve immediately.