Master the Art of Texas BBQ Brisket at Home
Ever dreamed of sinking your teeth into tender, smoky BBQ Brisket (Texas Style) without the long drive or hefty price tag? You’re in luck! Mastering this iconic dish in your own kitchen is not only achievable but incredibly rewarding. There’s something deeply satisfying about transforming a humble cut of beef into a culinary masterpiece, rivaling even the most renowned smokehouses. And when it comes to smoked brisket, the journey from raw meat to succulent perfection is a true labor of love that pays off in spades. This comprehensive guide will walk you through every step, ensuring your homemade Texas BBQ brisket is a showstopper.
Ingredients & Kitchen Tools
- 12-15 lb Whole Beef Brisket (Packer Cut): This includes both the flat and the point, essential for the authentic smoked brisket experience.
- For the Rub:
* ½ cup Coarse Black Pepper: The backbone of Texas BBQ flavor.
* ½ cup Kosher Salt: Enhances flavor and helps form a beautiful bark.
* ¼ cup Garlic Powder: Adds an aromatic depth.
* 2 tbsp Onion Powder: Complements the garlic and pepper.
* Optional: 1 tbsp Smoked Paprika: For added color and a subtle smoky undertone.
- For Spritzing (Optional, but recommended):
* 1 cup Apple Cider Vinegar: Adds moisture and a tangy kick.
* 1 cup Water: Dilutes the vinegar.
- Foil or Butcher Paper: To wrap the brisket during the stall. Butcher paper is preferred for a crispier bark.
- High-Quality Wood Chunks or Pellets: Oak or Post Oak are traditional for Texas brisket; pecan or hickory are also excellent choices.
- Meat Thermometer (Leave-in probe and instant-read): Crucial for precise temperature monitoring.
- Smoker or Grill with Indirect Heat Setup: Your chosen apparatus for low-and-slow cooking.
- Heavy Duty Gloves: For handling the hot brisket.
- Large Cutting Board & Sharp Carving Knife: Essential for slicing after resting.
- Aluminum Tray: For resting the brisket.
Prep Time & Cooking Schedule
- Prep Time: 30 minutes (trimming and seasoning) + 8-12 hours (optional overnight dry brining).
- Cook Time: 10-16 hours (approximately 1-1.5 hours per pound at 250°F / 121°C). This extended cooking time allows the connective tissues to break down, resulting in incredibly tender meat.
- Resting Time: 2-4 hours. This is non-negotiable for juicy, perfect brisket. Plan your cook backwards from when you want to serve. If targeting a 6 PM dinner, the brisket ideally should be off the smoker by 2 PM, allowing for adequate rest.
Step-by-Step Instructions
1. Trim the Brisket: Start by meticulously trimming the large, hard fat cap down to about ¼ inch thick. Remove any silverskin or excessively hard fat pockets. Shape the brisket to be aerodynamic for even cooking.
2. Apply the Rub: Generously coat the entire brisket with your prepared rub. Don’t be shy; the bark is where much of the flavor resides. For the best results, allow the seasoned brisket to sit in the refrigerator overnight, uncovered, to allow the rub to set.
3. Preheat Your Smoker: Set your smoker to a consistent 250°F (121°C). Once preheated, add your wood chunks or pellets to establish a clean smoke.
4. Smoke the Brisket: Place the BBQ Brisket (Texas Style) fat-side up (or towards the heat source, if applicable) in your smoker. Insert your leave-in probe into the thickest part of the flat, avoiding major fat pockets. Let it smoke undisturbed for the first 5-6 hours.
5. Spritz (Optional): After the initial smoke phase, you can begin spritzing the brisket every hour or so with your apple cider vinegar/water mixture. This helps keep the surface moist and promotes bark development.
6. The Stall: Around 150-170°F (65-77°C) internal temperature, the brisket will hit “the stall,” where its temperature plateaus. This is due to evaporative cooling.
7. Wrap the Brisket: Once the internal temperature reaches the stall and the bark has developed nicely (usually around 6-8 hours into the cook), wrap the smoked brisket tightly in butcher paper or foil. This pushes it through the stall and locks in moisture.
8. Continue Cooking: Return the wrapped brisket to the smoker. Continue cooking until the internal temperature reaches 200-205°F (93-96°C) and the brisket feels “probe tender” – the probe should slide in with very little resistance, like butter.
9. Resting: This is critical! Remove the brisket from the smoker, still wrapped, and place it in an empty cooler or a warm oven (turned off) for at least 2 hours, ideally 3-4 hours. This allows the muscle fibers to relax and reabsorb juices, ensuring maximum tenderness and juiciness.
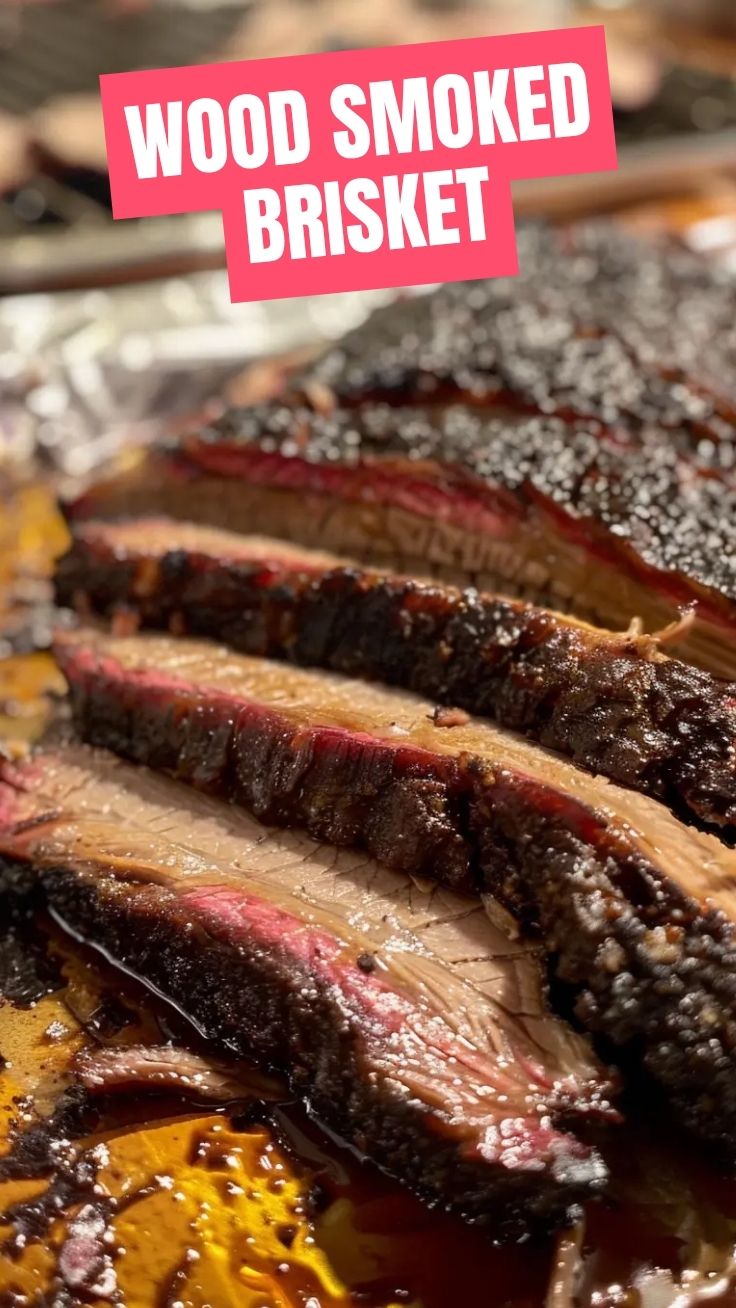
10. Slice and Serve: Once rested, unwrap the brisket. Separate the flat from the point (they’ll be easily distinguishable). Slice the flat against the grain into pencil-thick slices. For the point, you can cube it for burnt ends or slice it thicker. Serve immediately!
Nutritional Benefits & Advantages
Beef brisket, while known for its fat content, contains monounsaturated fats, which are healthier than saturated fats. It’s an excellent source of protein, essential for muscle repair and growth, and rich in B vitamins (especially B12), iron, and zinc, vital for energy production and immune function. Slow smoking also helps retain many of these nutrients, making it a flavorful and beneficial meal when enjoyed in moderation.
Tips, Variations & Cooking Advice
- Wood Choice: Experiment with different woods. While oak is king in Texas, mesquite offers a stronger flavor, and cherry or apple provide a milder, sweeter smoke.
- Injecting: For extra moisture and flavor, some pitmasters inject the brisket with beef broth, beef tallow, or a mixture before smoking.
- Burnt Ends: The “point” of the brisket is perfect for making delectable burnt ends. After separation, cube the point, toss with extra rub and BBQ sauce, and return to the smoker for another 2-3 hours until sticky and caramelized.
- No Smoker? No Problem! You can achieve decent smoked brisket in an oven using a liquid smoke approach, or on a gas grill with a smoker box. While not exactly the same, it can yield tasty results.
Common Mistakes to Avoid
- Not Trimming Properly: Too much fat prevents bark formation; too little leads to dry meat.
- Cooking at Too High a Temperature: Patience is key. Rushing the cook leads to tough, dry brisket.
- Not Wrapping During the Stall: This prolongs cooking time significantly and can dry out the bark.
- Skipping the Rest: This is perhaps the biggest mistake. A proper rest allows juices to redistribute, guaranteeing a moist, tender result. Cutting too early will result in a dry brisket as all the juices run out.
- Cutting with the Grain: Always slice against the grain for maximum tenderness.
Storage & Meal Prep Tips
Cooled smoked brisket can be stored in an airtight container in the refrigerator for 3-4 days. For longer storage, slice the brisket, then vacuum seal portions or wrap tightly in plastic wrap and foil before freezing. It will retain quality for up to 3 months. When reheating, it’s best to do so gently – either in a low oven (covered with a bit of beef broth) or steaming, to prevent drying out. This BBQ Brisket (Texas Style) is excellent for meal prep, offering incredible leftovers for sandwiches, tacos, or even breakfast hash!
Conclusion
Creating your own BBQ Brisket (Texas Style) is a journey that’s as rewarding as the mouth-watering result. From meticulously trimming the meat to patiently observing your smoker, each step contributes to the unforgettable flavor and tenderness of perfectly smoked brisket. Don’t be intimidated; embrace the process, trust your thermometer, and most importantly, enjoy the delicious fruits of your labor. Give this recipe a try, and prepare to impress yourself and your guests. Share your brisket triumphs in the comments below – we’d love to hear about them!
FAQs
1. What’s the difference between the flat and the point?
The flat is the leaner, flatter section, typically sliced for sandwiches. The point is the thicker, fattier end, often used for burnt ends due to its marbling and rich flavor.
2. How do I know when my brisket is “probe tender”?
When a thermometer probe or skewer slides into the meat with minimal resistance, like pushing through warm butter, it’s probe tender. This is more important than hitting an exact internal temperature, as brisket tenderness varies.
3. Can I use a cheaper cut of beef?
While other cuts can be slow-cooked, a packer brisket is specifically designed for the low-and-slow smoking process, offering the optimal fat-to-meat ratio for tenderness and flavor.
4. My bark isn’t forming. What went wrong?
Insufficient airflow, cooking at too low a temperature for too long without enough initial smoke, or wrapping too early can hinder bark development. Ensure your smoker has good ventilation and avoid wrapping until the bark is set.
5. How do I prevent my brisket from drying out?
Proper trimming, spritzing (optional), wrapping during the stall, pulling it at probe tender (not just temperature), and a long, adequate rest are all crucial for moist brisket.
Proven Way to Grow Your BBQ Brisket (Texas Style) in 3 Steps
Ingredients
Equipment
Method
- Trim the brisket by removing hard fat and shaping it for even cooking, ensuring about 1/4 inch of fat remains on the fat cap.
- Season generously with a 50/50 mix of coarse black pepper and kosher salt, then preheat your smoker to 250°F (120°C) using oak or hickory wood.
- Place the brisket fat side up and smoke for 6-8 hours or until an internal temperature of 165-175°F (74-79°C) is reached, spritzing every hour with a mixture of apple cider vinegar and water after the first 3 hours.
- Wrap the brisket tightly in butcher paper or foil once it hits the target temperature, then return it to the smoker at 275°F (135°C) until it reaches an internal temperature of 200-205°F (93-96°C) and feels very tender.
- Remove the brisket from the smoker and let it rest, still wrapped, in an insulated cooler for 2-4 hours to redistribute juices and enhance tenderness.
- Unwrap the brisket, separate the flat and the point, and slice the flat against the grain into pencil-thick slices.