The Ultimate 7-Layer Dip Guide: A Crowd-Pleasing Appetizer You Can Master at Home
Have you ever wondered why every party table disappears the moment a bowl of 7-Layer Dip is placed down? It’s not just the creamy layers or the satisfying crunch – it’s the perfect balance of flavors that turns any gathering into a fiesta. Preparing this iconic dish at home isn’t just about saving money; it gives you full control over ingredient quality, spice levels, and freshness. Whether you’re hosting game day, a family reunion, or simply craving bold Mexican appetizers, homemade versions always win over store-bought platters. In this guide, you’ll learn how to build a stunning 7-Layer Dip that rivals any restaurant version – and discover why it’s a staple among Mexican appetizers for last‑minute entertaining.
Ingredients & Kitchen Tools
| Ingredient | Quantity | Notes / Substitutions |
|————|———-|———————–|
| Refried beans | 1 can (16 oz) | Use black beans or pinto beans; vegetarian refried beans work well |
| Sour cream | 1 cup | Greek yogurt or vegan sour cream for lighter/dairy‑free |
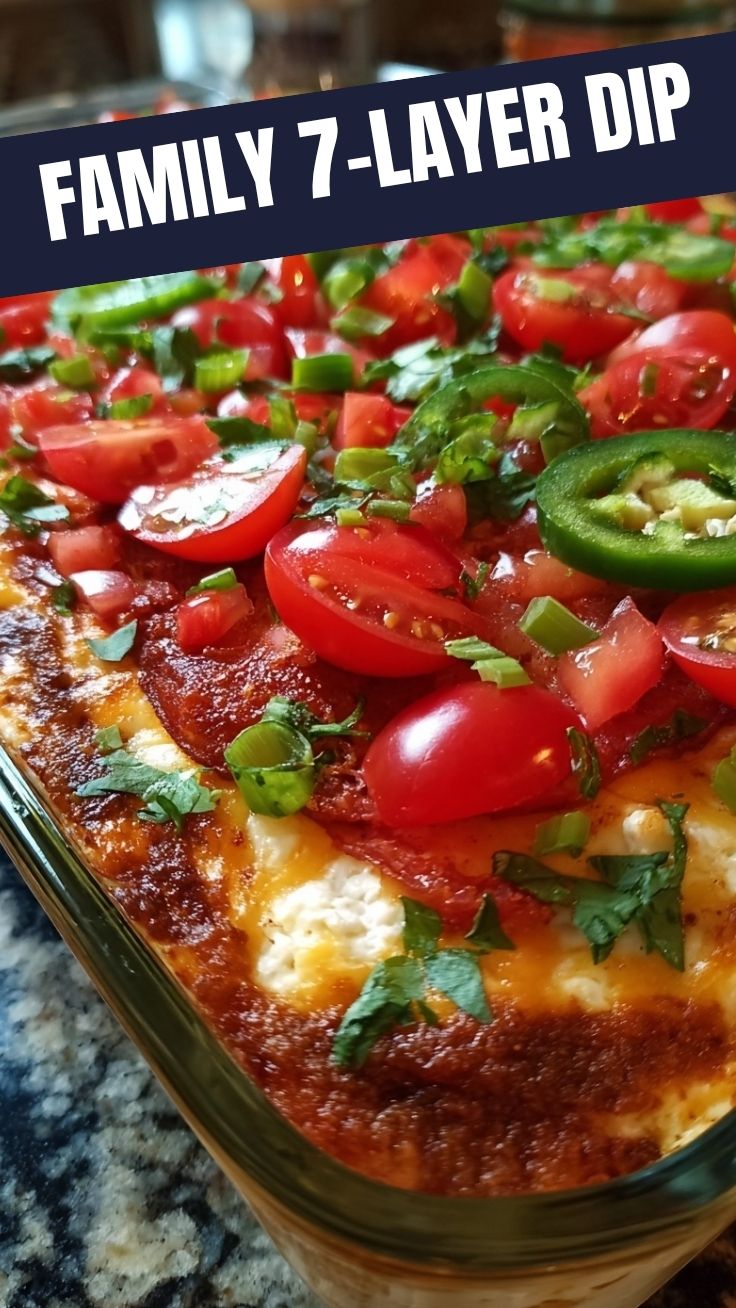
| Guacamole | 1 cup | Store‑bought or homemade (see tips) |
| Salsa | 1 cup | Use pico de gallo for chunkier texture |
| Shredded cheddar cheese | 1 cup | Mexican blend, Monterey Jack, or vegan shreds |
| Black olives | ½ cup (sliced) | Optional – or use diced green onions |
| Green onions | 3–4 (sliced) | Plus extra for garnish |
Kitchen tools: 9×13-inch glass dish or large pie plate, mixing bowls, rubber spatula, sharp knife, cutting board, measuring cups, and a small offset spatula for even layering.
Pro tip: If you’re short on time, pick up pre-made guacamole and salsa from the refrigerated aisle – just read labels for freshness.
Prep Time & Cooking Schedule
This 7-Layer Dip requires zero cooking – it’s all about assembly! Total active time is only 15 minutes, plus 30 minutes resting in the refrigerator to meld flavors. Plan ahead: if you’re serving at 6 PM, start prepping at 5:15 PM. You can also prepare it up to 24 hours in advance (store covered in the fridge) – perfect for stress‑free entertaining. The dip stays fresh for several hours at room temperature, but for best texture, keep chilled until serving.
Step-by-Step Instructions
1. Prepare the base – Spread the refried beans evenly on the bottom of your serving dish. Use the back of a spoon to smooth them into a flat layer. If the beans are stiff, microwave for 30 seconds to soften.
2. Layer the sour cream – In a small bowl, mix the sour cream with 1 tablespoon of taco seasoning (optional) for extra zip. Gently spread over the bean layer.
3. Add the guacamole – If using homemade, squeeze a little lime juice on top to prevent browning. Spread carefully to avoid mixing with the sour cream.
4. Pour the salsa – Drain excess liquid from the salsa before spooning it over the guacamole. This prevents the dip from becoming watery.
5. Top with cheese – Sprinkle shredded cheddar evenly across the salsa layer.
6. Garnish – Scatter sliced black olives and green onions over the cheese.
7. Chill and serve – Cover with plastic wrap and refrigerate for at least 30 minutes. Serve with tortilla chips or fresh veggie sticks.
Temperature control tip: Let the dip sit at room temperature for 10 minutes before serving – cold dip mutes flavors. For a warm variation, bake at 350°F for 10 minutes (use heat‑safe dish).
Why this works: Each 7-Layer Dip is a perfect bite of creamy, crunchy, tangy, and savory – it’s no wonder that Mexican appetizers like this one are the most requested party platters across every potluck.
Nutritional Benefits & Advantages
A single serving (about ¼ cup) provides roughly 150–200 calories, 10g fat, 12g carbs, and 6g protein. The black beans deliver fiber (5g per serving) and plant‑based iron, while the avocado in guacamole offers heart‑healthy monounsaturated fats and potassium. Sour cream provides calcium and probiotics. The salsa adds lycopene from tomatoes and vitamin C. Compared to heavy party foods, this dip is surprisingly balanced – a great option for nutrient‑dense snacking.
Tips, Variations & Cooking Advice
| Variation | How to Adapt |
|———–|————–|
| Gluten‑free | Already gluten‑free if using certified GF refried beans and salsa |
| Dairy‑free / Vegan | Use vegan sour cream, dairy‑free cheese, and skip the olives (check labels) |
| Spicy kick | Add diced jalapeños to the salsa or use chipotle sour cream |
| Protein boost | Layer seasoned ground beef or shredded chicken between beans and sour cream |
| Low‑carb | Replace beans with a layer of cauliflower mash and skip tortilla chips – use celery sticks |
For a smoky twist, mix ½ teaspoon smoked paprika into the refried beans. If you’re hosting a crowd, double the recipe and use a 9×13-inch baking dish.
Common Mistakes to Avoid
– Watery salsa: Always drain canned salsa or pico de gallo before layering. Excess liquid turns the dip into soup.
– Mixing layers: Use a gentle spreading motion; never press down hard or the layers blend together.
– Skipping the chill time: At least 30 minutes in the fridge allows flavors to marry and the dip to set.
– Overdoing the cheese: Too much cheese can overwhelm the other layers – stick to the 1‑cup guideline.
– Using stale chips: Serve with fresh, sturdy tortilla chips that can hold the dip without breaking.
Storage & Meal Prep Tips
– Refrigeration: Store leftovers in an airtight container for up to 3 days. The guacamole may brown slightly – press plastic wrap directly onto the surface to minimize oxidation.
– Freezing: Not recommended – sour cream and guacamole become watery when thawed.
– Reheating: If you baked the dip, reheat in a 350°F oven for 10 minutes. For cold dips, just bring to room temperature.
– Meal prep: Assemble all layers except the cheese and olives. Add them just before serving to keep the cheese from sweating and olives from bleeding.
Conclusion
This 7-Layer Dip is your go‑to recipe for effortless entertaining – it’s quick, customizable, and always disappears first. By making it at home, you control the quality, adjust the spice, and avoid preservatives. Whether you’re serving it as part of a fiesta or a simple snack, this dip proves that Mexican appetizers can be both impressive and easy. Try it this weekend, snap a photo, and tag us – we’d love to see your layers!
Frequently Asked Questions
1. Can I make this 7-Layer Dip a day ahead?
Yes, assemble up to 24 hours in advance, but add the cheese and olives right before serving to maintain texture.
2. What if I don’t have refried beans?
Mash canned black or pinto beans with a fork and add a pinch of cumin and chili powder – it works perfectly.
3. How do I prevent the guacamole from turning brown?
Press a layer of plastic wrap directly onto the guacamole before adding the next layer, or drizzle with lime juice.
4. Can I serve this warm?
Absolutely! Use an oven‑safe dish, bake at 350°F for 10 minutes after layering everything (except the cold sour cream). Let it cool slightly before serving.
5. What chips are best for dipping?
Look for restaurant‑style tortilla chips with a bit of salt – they’re sturdy enough to scoop without breaking.